A few years ago I was tasked with setting up Drupal as an Identity Provider for a WordPress site. In my research I found only one WordPress plugin I liked that would allow for a generic OpenID Connect authentication flow, but it was lacking in support and documentation. So I forked the plugin and started maintaining my own version, with my first task providing inline documentation and developer extensibility.
That plugin is OpenID Connect Generic. Unlike other WordPress plugins I have in the official wordpress.org repo, I wanted this project to focus much more on developers and to allow for easy participation in maintenance and support. So I created and maintain this project solely on Github.
In the interest of providing some additional documentation and support, I’ve decided to write this post to show exactly how this plugin can be setup to authenticate users with Drupal as the IDP.
Terminology:
- IDP: Identity Provider – the system that authenticates users.
- SP: Service Provider – the system that require authentication from the IDP.
In this example, Drupal is the Identity Provider and WordPress will be the Service Provider.
Prerequisites:
- Drupal 7 site w/ OAuth2 Server module
- WordPress site with OpenID Connect Generic plugin
For this post my Drupal site is setup at the URL http://d7.dev, and WordPress is setup at the URL http://wp.dev.
Setup Drupal OAuth2 Server module
The first thing you need to do for setting up this module is to install it and its dependencies:
Next, edit the OAuth2 Server module permissions to allow Anonymous users the “Use OAuth2 Server” permission. This permission required for anonymous users to access the /oath2/authorize Drupal URL.
Then create a new Drupal user that we will use later for testing. The details for the user are not important, just make sure it has a username and password you can remember for later.
Now we’re ready to configure the server and setup a simple client.
Configure a new OAuth2 Server & Client
In Drupal, navigate to /admin/structure/oauth2-servers and click “Add Server”.
Provide the new server with a label that will help you identify it. Anything will do, such as “My OAuth2 Server”.
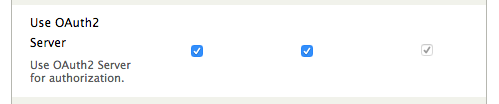
Here you’ll be presented with the some choices about how you want the server to handle authentication of users. For this example, we’re going to keep it simple. Check the following settings and leave any other settings unchecked.
- Use OpenID Connect
- Grant Type: Authorization code
- Grant Type: Refresh token
- Unset (delete) the refresh token after it has been used
You can leave the advanced settings as the default provided by the module. These are reasonable token lifetimes.

After saving you should be redirected to your list of servers. On the row for the server you just created, click the link titled “clients”.
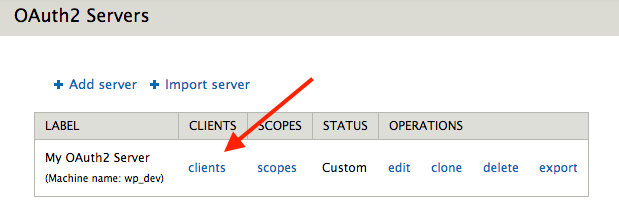
This will take you to the list of clients that are allowed to authenticate with your new server (currently none). Click “Add Client”.
On this new page, we will setup what is essentially a username and password your WordPress OpenID Client will use to communicate with your new OAuth2 Server. Provide the following details and note them somewhere safe, we will need this information again when setting up WordPress.
- Label: Can be anything. I like to use the name of the website that will be connecting to the server.
- Client ID: This is essentially the “username” the WordPress will use to connect to Drupal
- Client Secret: Essentially the “password” WordPress will use when connecting to Drupal. This should be very long and unique.
- Redirect URIs: The URIs that Drupal will allow redirection to during authentication. This is a security measure to ensure your identify provider is not providing identity information to the wrong service providers. In this field, provide the following URI but replace “example.com” with the domain of your WordPress website.
http://example.com/wp-admin/admin-ajax.php?action=openid-connect-authorize
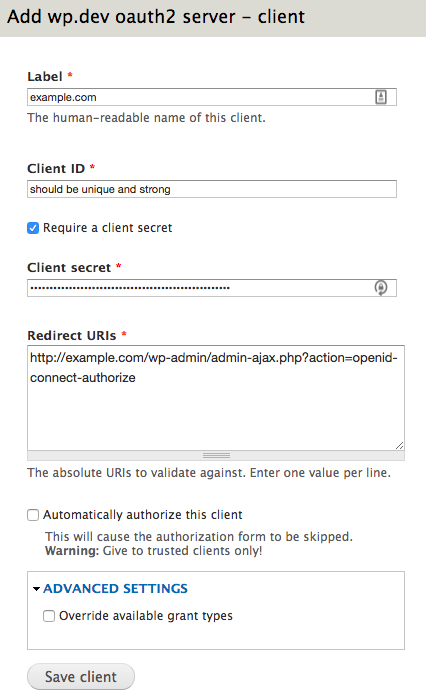
Save this client and we should be all done setting up Drupal!
Setup WordPress OpenID Connect Generic Plugin
In a working WordPress installation, enable the OpenID Connect Generic plugin, then visit its configuration page at Settings > OpenID Connect Client (/wp-admin/options-general.php?page=openid-connect-generic-settings)
Here we tell the plugin how to connect to Drupal.
- Client ID: The same client ID you told Drupal to expect when setting up the client. Essentially the “username”.
- Client Secret: The same Client Secret you told Drupal to expect when setting up the client. Essentially the “password”.
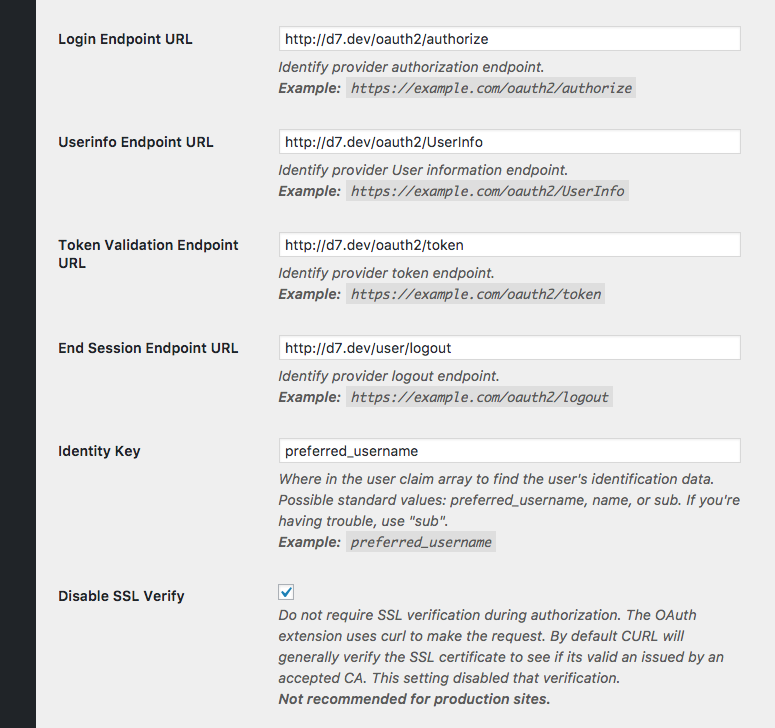
Since I wrote this plugin with the OAuth2 Server module in mind, most of the examples provided beneath each field are similar to what we want to use. Here are the settings for my example, where Drupal is installed and configured at http://d7.dev.
- Login Endpoint URL:
http://d7.dev/oauth2/authorize - Userinfo Endpoint URL:
http://d7.dev/oauth2/UserInfo
(Note the capitalization) - Token Validation Endpoint URL:
http://d7.dev/oauth2/token - End Session Endpoint URL:
http://d7.dev/user/logout
(This is Drupal’s logout URI) - Identity Key:
preferred_username - Disable SSL Verify: Checked depending on whether or not you have SSL enabled for both Drupal and WordPress. A production site should always use SSL when providing identities.
The remainder of the settings are up to personal preference and may require some fine tuning to get the exact results you want.
And with that, you should be ready to test!
Testing
In an incognito browser window, visit your WordPress site login page. Here you should see a new button above the login form we will use to login.
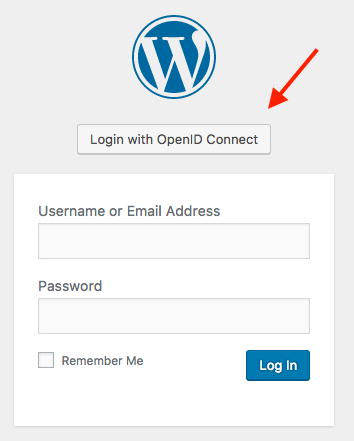
- Click “Login with OpenID Connect” and you will be forwarded to your Drupal website login form.
- Login to Drupal with the test user you created at the very beginning of this article.
- After successfully logging in, you will be asked by Drupal to authorize it to use your account. You should also see the IDP client scopes listed.
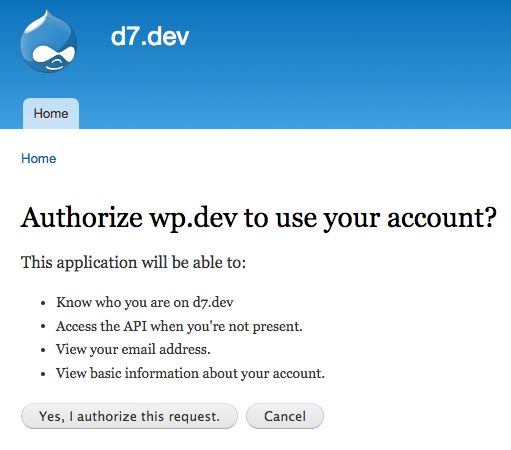
Click “Yes, I authorize this request” and you should be redirected back to WordPress logged in as the test user.
Huzzah! You should now be well on your way to OpenID Connect between WordPress and Drupal ?
Debugging
If you run into issues when attempting to login, the OpenID Connect Generic plugin as a build in logger that can help you determine the problem.
In WordPress on the Settings page for OpenID Connect Client, check “Enable Logging”. This will record successes and failures for debugging purposes. You should be able to see attempts to login, as well as error codes and messages related to those attempts.
For example, here is an error I got when setting this up:
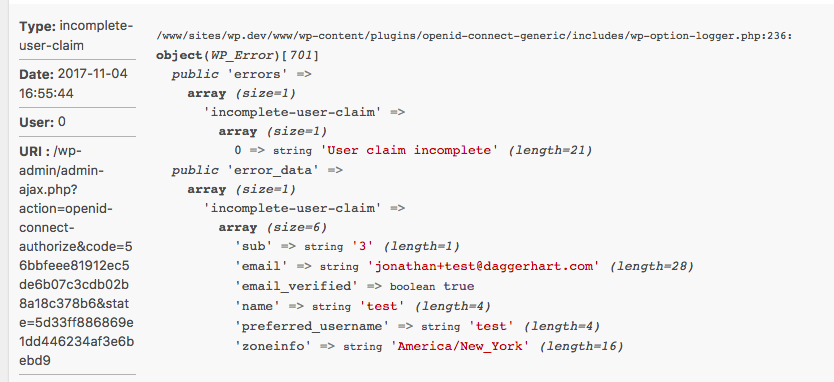
This specific error was due to me having setup the Display Name Formatting option incorrectly. It is telling me that some properties I hoped to find in the user claim were not present.
Support & Improvements
If you find an error with this article, or hope for more clarity around a mentioned subject (connecting WordPress to Drupal 7), please comment below! I’m always happy to improve articles for clarity.
If you have an issue with the WordPress plugin itself, please submit issues or fixes to the GitHub repo. You’re much more likely to get an answer there. I will not be able to support this plugin in the comments here.
Thanks, and happy OAuthing!
Discussion
Hi, @Jonathan Daggerhart This is really a very great article. I have understood the concept of openID and also the Oauth 2 server. I am following same procedure but using OpenID connect and simple Oauth2. Do you have any idea about it? I am basically stuck with the issue of redirecting using the open ID and SimpleOauth I have the main site (abc.com) and a supporting site (xyz.com). I have used Open id on the support site and simple Oauth for the main site and allowing the user to authorize from abc.com and redirect link to xyz.com. Do you have any idea about how can I solve this issue ??? Thanks in advance. :smiley: